Avalara AvaTax Setup Guide
Configuration/User Guide
Avalara AvaTax is a cloud-based solution automating transaction tax calculations and the tax filing process. Avalara provides real-time tax calculation using tax content from more than 12,000 US taxing jurisdictions and over 200 countries, insuring your transaction tax is calculated based on the most current tax rules.
Connect to AvaTax
After installing the AvaTax integration you need to configure the integration
- Go to [Settings] > [Sales Tax Wizard]
- Click [Avatax Tab] and Add Credentials below.
- Enter your Avalara AvaTax Credentials:
- Account Number: Provided during your AvaTax account activation process.
- Software License Key: Provided during your AvaTax account activation process
- Service URL: URL to connect to the Development or Production AvaTax services
- Company Code/ID: Company profile identifier in the AvaTax Admin Console.

- Click the Test Connection button.
Configure Avalara AvaTax
Once connected, you see additional settings.
- Disable Tax Calculation – Turn off the AvaTax calculation service.
- Enable Document Committing/Submission – Enables tax document submission to Avalara’s AvaTax service for record keeping. With this setting enabled, transactions will be posted and committed to the AvaTax Admin Console.
- Default Freight Code – The default Avalara AvaTax System Tax code used for Freight/Shipping.
- Enable Logging – Log detailed transaction activity for troubleshooting purposes. Enable only when instructed by support.
- Link to AvaTax Admin Console – Access the Avalara AvaTax Admin Console
- [Address Validation] – Option to enable or disable address validation]
- [Address Validation Filter by country] – choose which countries will be used for Address Validation]
Assign an Avalara tax exempt category to a customer
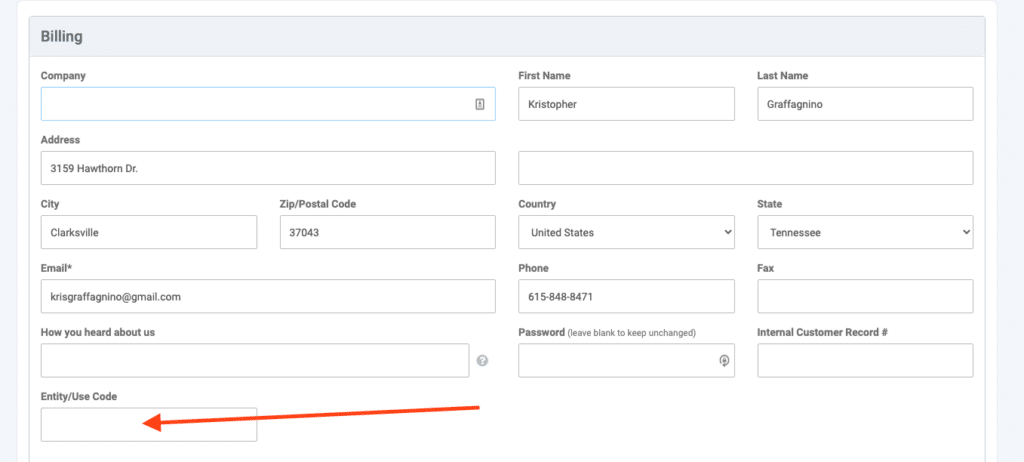
- Click [Customers] > [Customer Edit]
- Click a customer record to enter the customer detail
- Click [Edit]
- In the [Tax Exemption Number] field, enter the customer’s exemption number.
- In the [Tax Exempt Category] field, select the appropriate customer type letter code.
A – Federal government (United States)
B – State government (United States)
C – Tribe / Status Indian / Indian Band (both)
D – Foreign diplomat (both)
E – Charitable or benevolent org (both)
F – Religious or educational org (both)
G – Resale (both)
H – Commercial agricultural production (both)
I – Industrial production / manufacturer (both)
J – Direct pay permit (United States)
K – Direct mail (United States)
L – Other (both)
M – Not Used
N – Local government (United States)
O – Not Used
P – Commercial aquaculture (Canada)
Q – Commercial Fishery (Canada)
R – Non-resident (Canada)
- Click Save.
Assign an AvaTax System Tax Code to an item
- Go to [Inventory] > [Manage Products]
- Select a Product to open the Product details screen.
- Click [Edit]
- Open the Inventory section under the General tab.
- In this section, enter the applicable AvaTax System Tax Code in the [Tax Code] field.
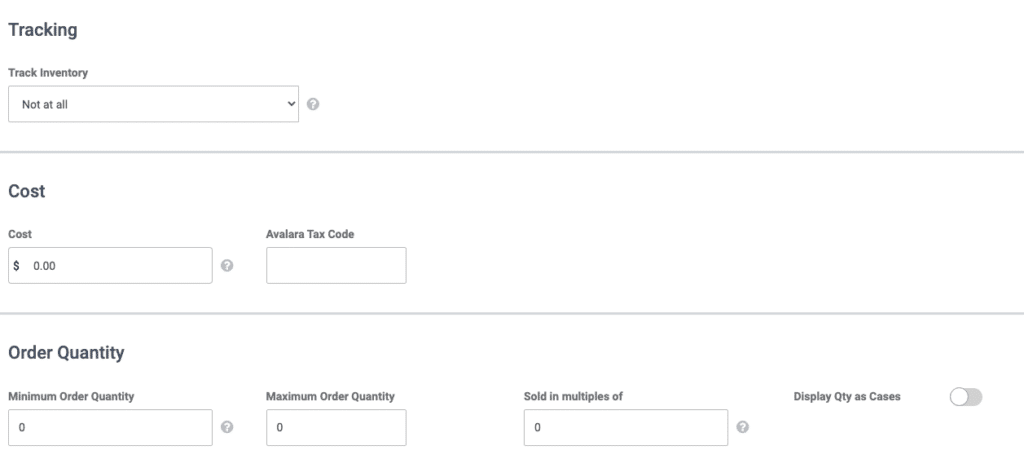
- Click Save.
- To see a listing of all available AvaTax System tax codes, click (http://taxcode.avatax.avalara.com).
Validate a customer address
- Click [Customers] > [Customer Listing]
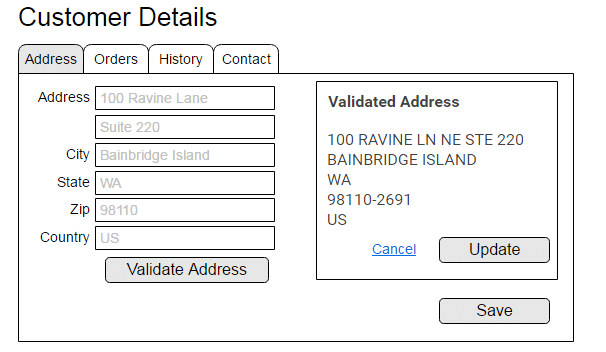
- Click a customer record to enter the customer detail screen.
- Click [Edit]
- On the [Address Tab] click the [Validate Address] button.
- Review the returned validated address, click the Update button to update the customer record with the returned address.
- Click Save.
**THIS HAPPENS ONLY IF YOU USE UPS OR FEDEX REAL TIME RATE QUOTES, AND IT HAPPENS UPON CHECKOUT.